
How to tell real leather from synthetic
Let's be upfront: telling real leather from vegan leather isn’t always easy, especially when you're sitting in a car. The term "vegan leather’ covers a huge range of materials, and the quality varies drastically. You"ll most commonly find Polyurethane (PU) and Polyvinyl Chloride (PVC), but newer bio-based options are appearing too. Understanding these differences is the first step, though, because the repair approaches are quite different.
Real leather has a natural grain pattern, and often subtle imperfections. It feels warm to the touch and develops a patina over time. PU leather often looks too perfect – the grain is consistently repeated, and it feels more like plastic. PVC is generally stiffer and cooler to the touch. Bio-based options try to mimic the look and feel of real leather, but often have a slightly different texture.
When inspecting for wear, real leather typically shows creasing and fading, but the material itself remains relatively strong. PU and PVC are prone to cracking and peeling, especially in high-wear areas. Knowing these visual cues will help you diagnose the damage accurately and choose the right repair method. A quick pinch test can also help; real leather will wrinkle and feel pliable, while vegan leather will feel more resistant.
Where real leather fails
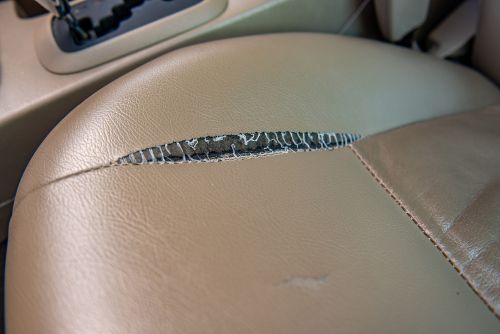
Real leather, while durable, isn't immune to damage. The most common issues are cracking, fading, and tearing. But the type of tear is critical – a surface scratch is a very different beast than a deep rip that goes through all the layers. The age of the leather plays a big role; older leather loses its natural oils and becomes more brittle.
Environmental factors accelerate leather damage. Prolonged sun exposure dries out the leather, leading to cracking. Temperature swings cause the leather to expand and contract, weakening the fibers over time. Even something as simple as body oils and acidic spills can contribute to wear and tear. The grade of leather used in the vehicle matters too – full-grain leather is the most durable, while bonded leather is the least.
I’ve seen interiors where the leather has become so dry it feels like paper. In those cases, even a gentle touch can cause further damage. Understanding how leather ages and what stresses it endures is the first step toward effective repair. Proper conditioning is key, but sometimes the damage is beyond a simple fix.
Why vegan leather peels and cracks
Vegan leather, being a synthetic material, has its own unique failure modes. PU and PVC are particularly susceptible to peeling and cracking – but this cracking is different from real leather. It's more brittle and often starts at the surface. Discoloration is also a common problem, especially with prolonged UV exposure.
Bio-based vegan leathers are newer to the market, so we're still learning about their long-term durability. Early reports suggest delamination – where the coating separates from the fabric backing – is a potential issue. Wear on the coating itself is also a concern. The quality of the base fabric significantly impacts the overall resilience.
One thing I've noticed is that many vegan leathers look like they should be simple to repair, but the underlying structure can be surprisingly complex. The plastic or synthetic layers don’t always respond well to traditional leather repair techniques. It's important to identify the specific type of vegan leather before attempting any repairs.
The reality of DIY repair kits
The internet is flooded with DIY leather repair kits, promising quick and easy fixes. Most kits include a filler compound, colorant, and a sealant. They can be effective for minor scratches and scuffs, but don’t expect miracles. I’ve tested several, and the results are highly variable depending on the quality of the kit and your skill level.
Matching the color is the hardest part. Kits usually provide primary tints you have to mix by eye, which rarely accounts for the way leather fades in the sun. You need to scrub the area with isopropyl alcohol and sand the edges of the tear so the filler has a physical edge to grip. Lawson's Car Reviews showed a decent walkthrough of this process in July 2025.
For deeper tears or extensive damage, these kits often provide only a temporary fix. The filler can shrink or crack over time, and the color may not be a perfect match. Be realistic about your expectations. If the damage is significant, you’re likely better off calling a professional. Don’t waste your money on a kit if the damage is beyond its capabilities.
Featured Products

Designed for repairing scratches, tears, and holes in leather and vinyl. · Includes color compounds to help match existing shades. · Suitable for use on car seats, furniture, and other leather goods.
This kit is a versatile option for addressing common damage on both real and vegan leather car seats, offering color matching capabilities for a seamless repair.

A comprehensive kit for repairing various types of leather and vinyl damage. · Features easy-to-follow instructions for color matching and application. · Can be used on a wide range of items including car seats, furniture, and accessories.
This kit provides an accessible and effective solution for restoring the appearance of damaged car seats, with user-friendly instructions for achieving a good color match.

Specifically formulated for brown leather and vinyl repairs. · Offers simple instructions for restoring color and texture. · Effective for mending tears, cracks, and scuffs on various leather items.
Ideal for brown leather car seats, this kit simplifies the repair process with clear instructions and effective restoration for common wear and tear.

A balm designed to restore color to faded or scratched black leather and vinyl. · Acts as a conditioner to help maintain the material's suppleness. · Suitable for use on car seats, furniture, shoes, and other leather accessories.
This recoloring balm is excellent for reviving the color of black leather or vegan leather car seats that have become faded or scratched, also providing conditioning benefits.
As an Amazon Associate I earn from qualifying purchases. Prices may vary.
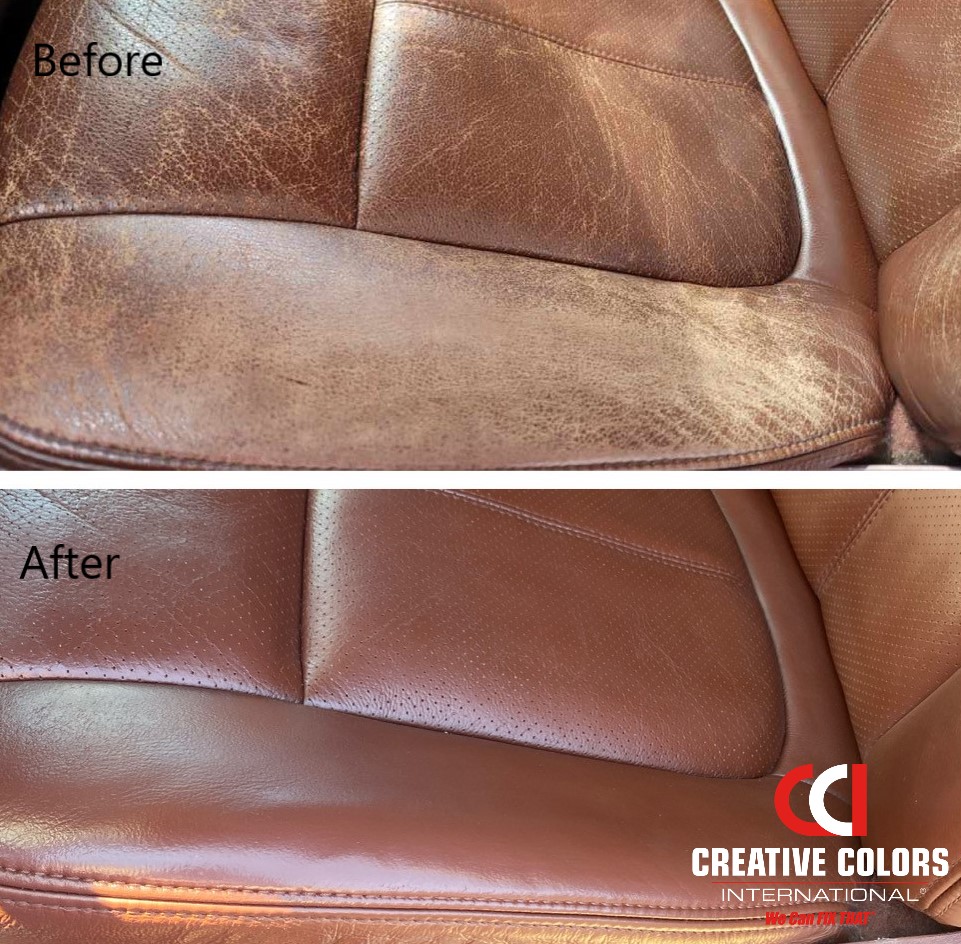
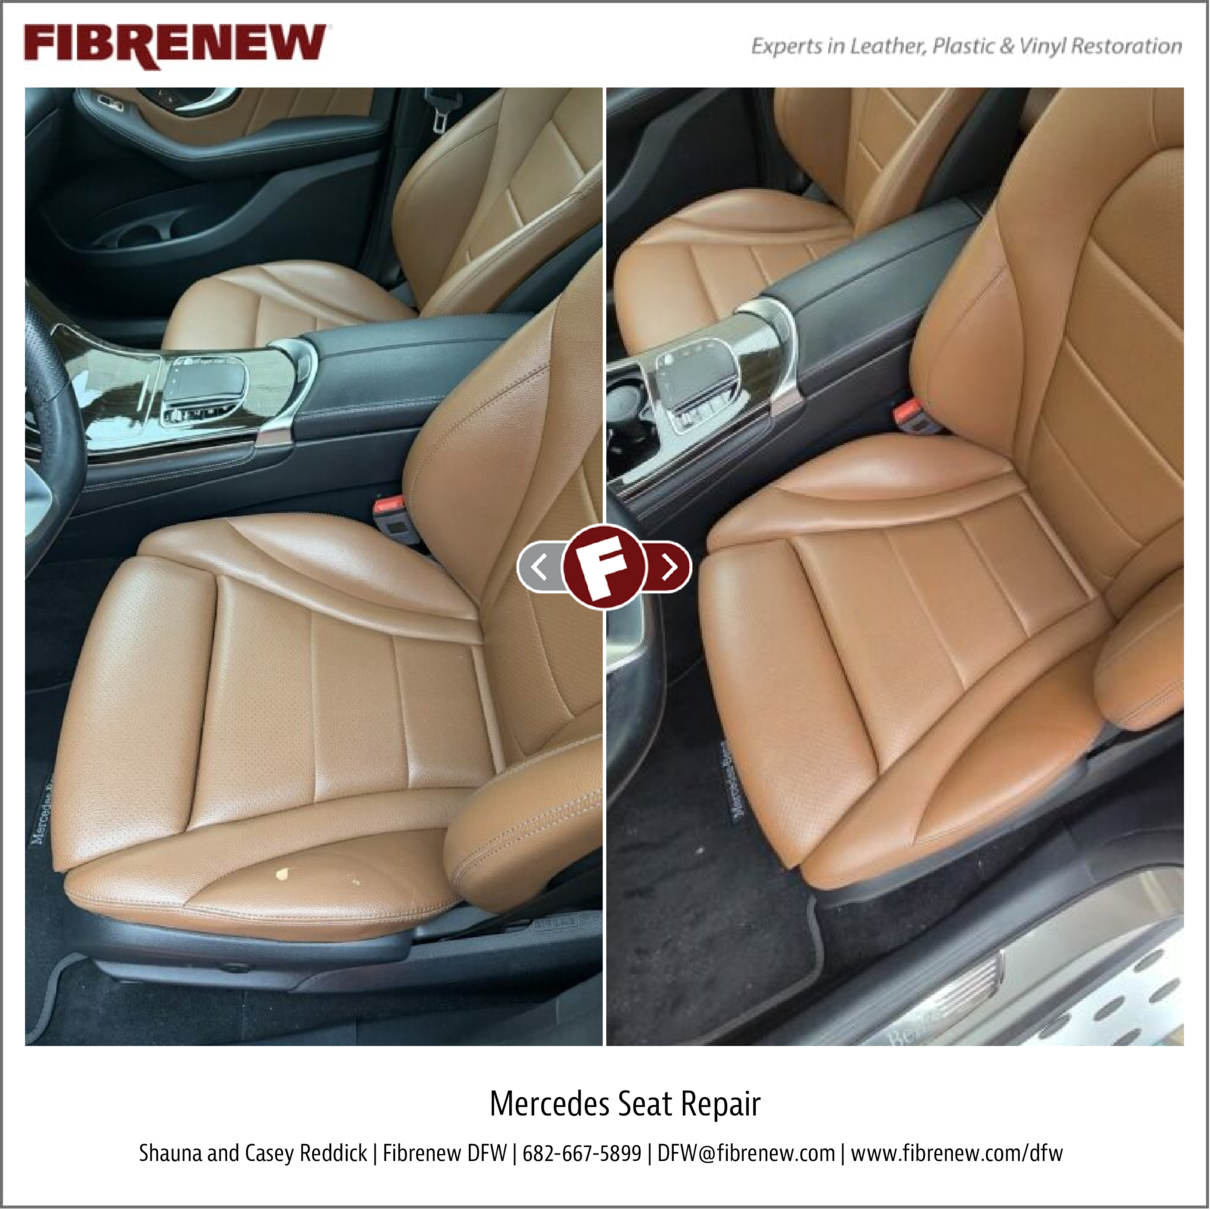
Professional Leather Restoration: When to Call an Expert
There are times when DIY simply won’t cut it. Deep tears, extensive cracking, significant color loss, or damage to the underlying structure all warrant a professional touch. Trying to tackle these issues yourself could actually make the problem worse.
Professional restorers use specialized techniques like cleaning, conditioning, re-dyeing, patching, and even replacing entire panels. They have the tools, materials, and expertise to achieve a seamless repair. Martin from Wheeler Detailers demonstrates a full professional restoration process in their June 6th, 2025 video – it’s a great example of what’s possible.
The cost of professional restoration varies widely depending on the extent of the damage and the vehicle. A small repair might cost around $150-$300, while a complete seat restoration can easily exceed $800 or more. It's an investment, but it can significantly increase the value and appearance of your vehicle. Don't hesitate to get quotes from multiple shops.
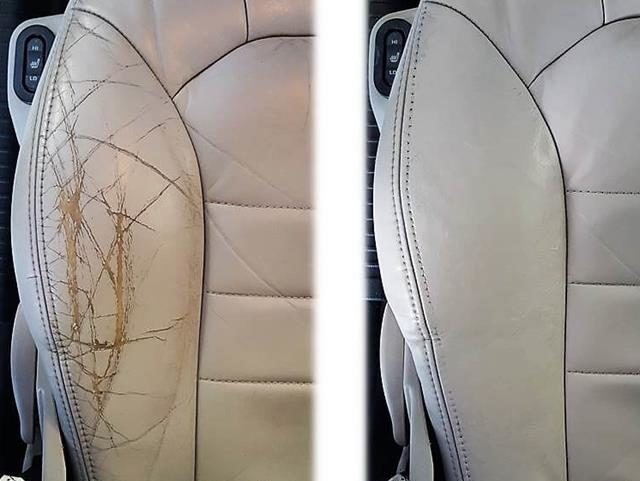
Steps for fixing real leather
Let’s get down to specifics. Here's a step-by-step guide to repairing common real leather damage. First, thoroughly clean the area with a leather cleaner. Then, lightly sand the surface to create a good bonding surface. Apply a leather filler compound in thin layers, allowing each layer to dry completely before applying the next.
Once the filler is dry, carefully sand it smooth, blending it seamlessly with the surrounding leather. Next comes color matching – this is where patience is key. Test the colorant in an inconspicuous area before applying it to the repair. Apply the colorant in thin coats, building up the color gradually. Finally, apply a leather sealant to protect the repair and restore the leather’s suppleness.
Remember, attention to detail is paramount. Take your time, and don’t rush the process. Proper preparation and careful application are essential for a successful repair. For small scratches, you might be able to skip the filler step and go straight to color matching and sealing. For larger tears, you may need to use a leather patch for added support.
Vegan Leather Repair: Unique Challenges
Repairing vegan leather presents unique challenges. The biggest hurdle is adhesion – many fillers simply don’t bond well with the plastic or synthetic surface. Thorough surface preparation is even more crucial than with real leather. Use a plastic adhesion promoter to improve bonding.
Color matching can also be tricky. With real leather, you can often re-dye the surface to achieve a perfect match. With vegan leather, the color is often part of the material itself, making it difficult to blend. You may need to experiment with different colorants or consider using a textured repair tape.
Repair strategies vary depending on the type of vegan leather. PU leather is generally easier to repair than PVC. Bio-based options may require specialized adhesives and techniques. Be aware that some vegan leathers are simply not repairable, and replacement may be the only option.
Preventative Care: Extending Seat Life
The best way to avoid costly repairs is to prevent damage in the first place. Regular cleaning is essential – vacuum the seats weekly and wipe them down with a leather cleaner or vinyl protectant. For real leather, regular conditioning is crucial to keep the leather supple and prevent cracking.
Park in the shade or use a thick windshield sunshade to stop UV rays from cooking the topcoat. If you have dogs or kids, seat covers are the only real way to prevent physical punctures. Keeping the surface free of grit prevents the friction that eventually turns into a crack.
Investing a small amount of time and effort in preventative care can save you a significant amount of money and hassle down the road. A well-maintained interior not only looks better but also increases the resale value of your vehicle.
- Vacuum seats weekly
- Clean with appropriate cleaner
- Condition real leather regularly
- Use sunshades
- Consider seat covers
No comments yet. Be the first to share your thoughts!