
Rethinking leather repair
Car owners are finally moving past the 'replace everything' mindset. Maintaining a premium leather interior shouldn't mean dumping toxic chemicals into the cabin or the local water supply. We need to treat repair as a conservation effort rather than just a cosmetic fix.
Traditional leather production is notoriously resource-intensive. From the water and energy used in raising livestock to the chemicals involved in tanning, the process carries a significant environmental footprint. Repairing leather, when done conventionally, can also contribute to this impact. We'll explore how the methods and materials used in leather repair can be adjusted for a more sustainable approach.
"Sustainable’ can mean a lot of different things. For some, it’s about reducing waste; for others, it’s about using natural materials. We’ll try to be specific about what each approach means in terms of environmental impact and performance. Ultimately, the goal is to help you make informed decisions about keeping your car"s interior looking great while minimizing its footprint.
The hidden cost of traditional fixes
Most standard repair kits are chemical cocktails. They rely on Volatile Organic Compounds (VOCs) that off-gas inside your car for weeks. Breathing in those fumes is a high price to pay for a smooth seat. Even without citing specific 2026 emission mandates, the health trade-off is obvious.
Beyond the chemicals, consider what happens to damaged leather. Often, sections that are too far gone end up in landfills. And when extensive repairs are needed, many shops will simply recommend replacing entire seat sections rather than attempting a repair. This generates a lot of waste and requires the production of new leather, perpetuating the cycle of resource depletion.
The sourcing of new leather for replacement panels or extensive repairs is another concern. The majority of leather still comes from conventional livestock farming, which, as mentioned earlier, has a substantial environmental impact. Even "genuine’ leather products can have a complex supply chain with limited transparency. It"s a system that benefits from a closer look.
Bio-based coatings
Fortunately, there’s a growing market for bio-based leather coatings and conditioners. These products aim to replace traditional petroleum-based chemicals with renewable alternatives. They often utilize plant-based oils, waxes, and resins derived from sources like flaxseed, castor beans, and even cashew shells—I’ve seen some promising developments using cashew shell oil as a durable coating.
The performance of these bio-based coatings is a key consideration. Early formulations sometimes fell short of traditional products in terms of durability and UV resistance, but advancements are being made rapidly. Many now offer comparable protection against cracking, fading, and staining. It’s essential to check product specifications and read reviews before making a purchase.
Bio-based products usually cost more at the register. You're paying for the R&D of plant-derived resins over cheap petroleum. I've found that the extra 15% in price is a fair trade for a cabin that doesn't smell like a solvent factory.
Here’s a quick comparison of traditional vs. bio-based coatings:
- Traditional coatings use petroleum bases and high VOC levels for durability.
- Bio-based alternatives use plant resins to achieve similar wear resistance without the fumes.
Traditional vs. Bio-Based Leather Coatings: A Comparative Overview (2026)
| Material Source | VOC Content | Durability | Water Resistance | UV Protection | Cost |
|---|---|---|---|---|---|
| Traditional Polyurethane Coatings | Petroleum-based, synthetic polymers | Generally High | Good | Moderate | Typically Lower Initial Cost |
| Bio-Based Polyurethane Coatings (e.g., from Castor Oil) | Renewable plant oils, reducing reliance on fossil fuels | Comparable to Traditional PU | Good, potentially enhanced with additives | Moderate to Good, dependent on formulation | Moderate – can be higher than traditional PU |
| Acrylic Coatings (Traditional) | Synthetic polymers derived from petroleum | Moderate | Fair – requires frequent reapplication of protectants | Moderate | Lower |
| Bio-Based Acrylic Coatings (e.g., from Corn) | Renewable resources, offering a lower carbon footprint | Moderate, ongoing research improving performance | Fair – similar to traditional acrylics, requires protectants | Moderate | Moderate to Higher |
| Natural Wax Coatings (e.g., Beeswax blends) | Naturally derived, biodegradable | Lower – requires more frequent conditioning | Moderate – offers some water repellency | Low to Moderate | Moderate |
| Casein-Based Coatings (Milk Protein) | Renewable, agricultural byproduct | Moderate – can be susceptible to cracking | Fair – requires careful application and protectants | Low | Moderate |
| Silicone-Based Coatings | Synthetic, but often with lower VOCs than traditional PU | Very High | Excellent | Very Good | Higher |
Qualitative comparison based on the article research brief. Confirm current product details in the official docs before making implementation choices.
Repairing, Not Replacing: Extending Leather’s Life
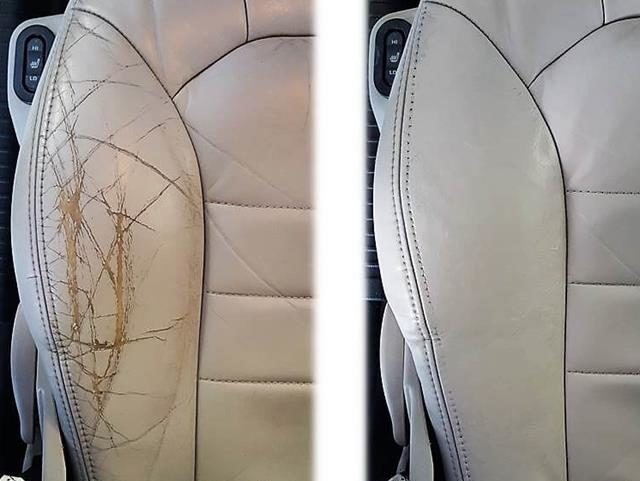
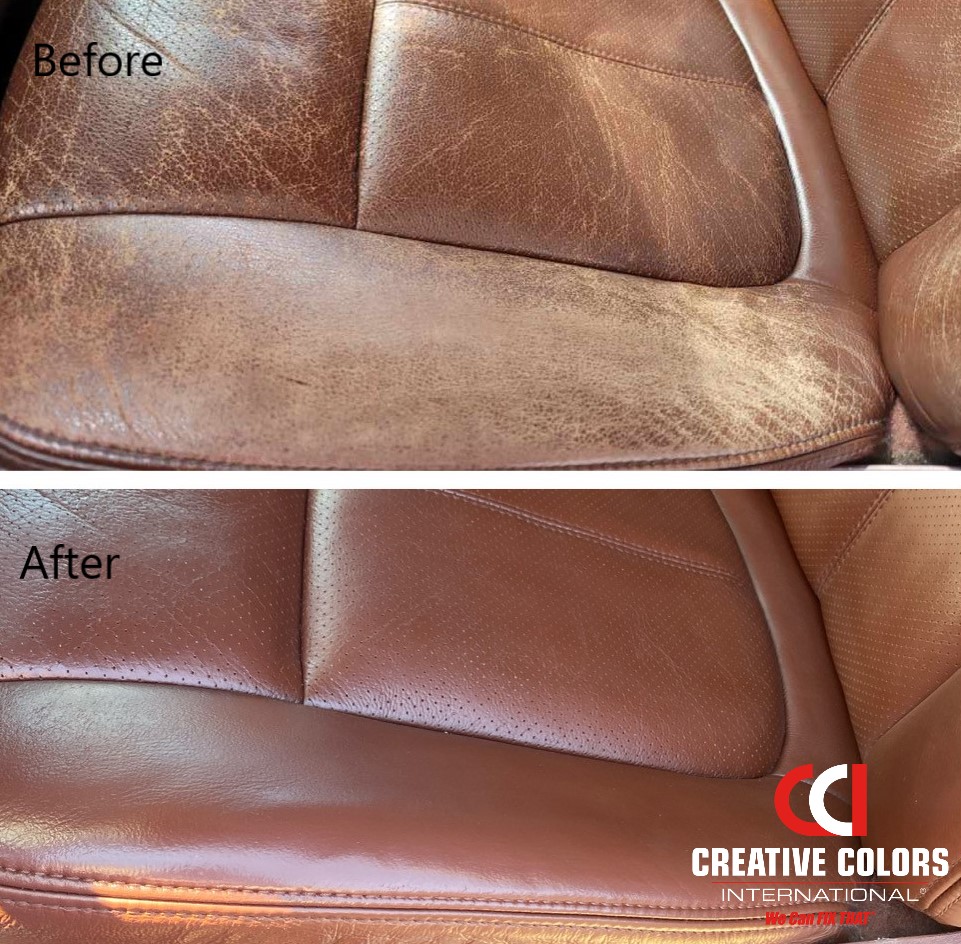
One of the most sustainable approaches to leather care is simply extending the life of what you already have. Repairing minor damage—scratches, small tears, fading—can prevent the need for more extensive repairs or full replacements down the road. Patching, filling, and re-dyeing are all viable options, depending on the nature and extent of the damage.
Before you start, carefully assess the damage. Small scratches can often be buffed out with a leather conditioner. Tears can be patched with a matching piece of leather, carefully glued and blended. For faded areas, re-dyeing can restore the original color. It’s important to choose the right repair method for the specific problem.
Visualizing the process helps before you start cutting patches. Most DIY kits follow a standard sequence: clean, bond, fill, and tint. Always test your dye on the underside of the seat first to ensure the color match is actually accurate.
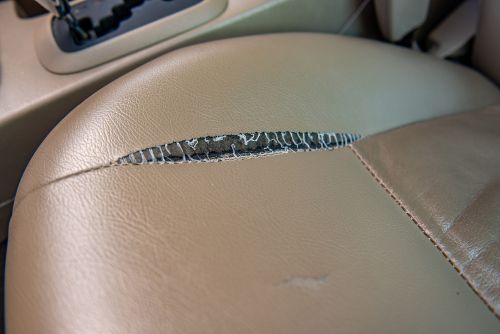
Here’s a simplified step-by-step for a small tear repair: 1) Clean the area around the tear. 2) Apply a leather adhesive to the edges of the tear. 3) Carefully press the edges together. 4) Use a leather filler to smooth out the area. 5) Apply a matching leather dye or conditioner.
DIY vs. Professional: Weighing Your Options
DIY leather repair can be a satisfying and cost-effective option for minor damage. Repair kits are readily available, and with a little patience, you can achieve good results. However, it's important to be realistic about your skill level. Complex repairs—like replacing entire seat sections—are best left to the professionals.
Attempting a repair beyond your abilities can lead to further damage and potentially a more expensive fix in the long run. It’s also important to consider the tools and materials required. You'll need a leather cleaner, adhesive, filler, dye, and potentially specialized tools like a heat gun or stitching awl.
The cost-benefit analysis depends on the extent of the damage and your comfort level. For a small scratch or tear, a DIY kit might cost $20-$50. For a more extensive repair, a professional might charge $100-$500 or more. Weigh the cost of materials and your time against the potential cost of professional services.
New materials on the horizon
The future of sustainable auto interiors is looking increasingly innovative. Lab-grown leather—created from animal cells without the need for raising livestock—is gaining traction as a potential alternative to traditional leather. This technology promises to significantly reduce the environmental impact of leather production.
Recycled materials are also playing a bigger role. Some manufacturers are incorporating recycled plastics and fabrics into their interiors. Advancements in bio-based coatings are continuing, with researchers exploring new materials and formulations that offer improved durability and performance.
I'm particularly curious to see how material science will shape this space. New materials with unique properties—like self-healing polymers—could revolutionize car interior repair and maintenance. While predicting the future is always difficult, it’s clear that sustainability will continue to be a driving force in the automotive industry.
No comments yet. Be the first to share your thoughts!