
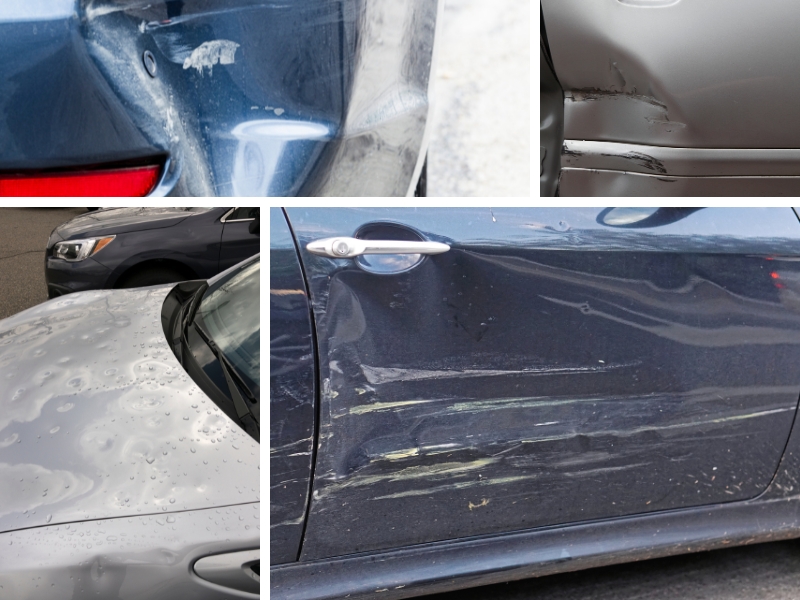
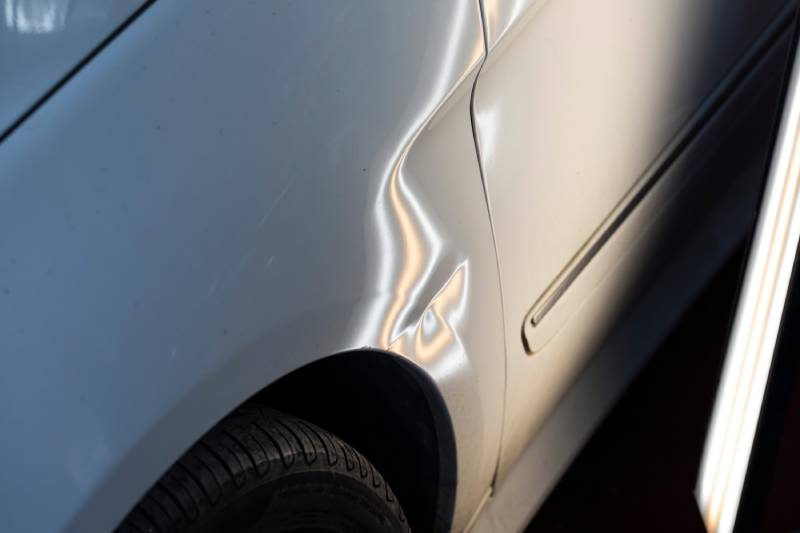
Assess the dent before you start
Determine if the damage is actually fixable with DIY methods. Attempting to repair the wrong type can stretch the metal further or crack the paint, turning a $50 fix into a $500 panel replacement.
When DIY Works Best
The best candidates for home repair are shallow dents with smooth, rounded edges, often resulting from hail, shopping carts, or minor door dings. If the paint is intact and the metal hasn’t been creased, you can often push the dent out from behind or use suction and glue-pull kits. The key is that the metal retains some flexibility.
When to Call a Pro
Some damage is beyond the scope of a home garage. If the dent has sharp creases, is located on a body line, or has cracked the paint, DIY methods will likely fail. Paintless Dent Repair (PDR) professionals have specialized lights and tools to massage out complex shapes without harming the finish. Attempting to fix these yourself can lead to rust forming in the compromised paint layer.
Quick Assessment Checklist
- Check the paint: If there is any chipping or cracking, stop. DIY repair won’t fix the corrosion risk.
- Feel the edges: Run your finger over the dent. If it feels sharp or angular, it’s likely too complex for a suction cup or glue kit.
- Consider the location: Dents on flat panels (doors, hoods) are easier to fix than those on curved fenders or near edges.
- Evaluate the size: Dents smaller than a golf ball are generally the most manageable for beginners.
If your dent passes these checks, you’re ready to move on to gathering your tools. If it fails, it’s better to get a quote from a local PDR specialist now than to waste time and money on a fix that won’t hold.
Gather the right tools for the job
You can’t fix a dent without the proper equipment. The tools you need depend on the repair method you choose, but most DIY dent removal projects rely on a core set of items. Having these ready before you start prevents interruptions and ensures you can apply the right amount of force.
For paintless dent removal (PDR), which is ideal for minor dings and creases, you’ll need specialized levers and rods to push the metal back into shape from behind the panel. If the dent is too shallow or accessible only from the outside, a glue-pulling kit with tabs and a puller bridge works well. For larger dents where the paint is cracked or the metal is deeply folded, you’ll need body filler (Bondo), sandpaper, and a hammer to reshape the panel before filling.
Below is a checklist of the essential tools for common DIY dent repair scenarios. Gather these before you begin to ensure a smooth process.
Use a plunger for shallow dents
A standard toilet plunger is often the most accessible tool for removing minor, shallow dents from your car's body panels. This method works best on smooth surfaces like doors, hoods, and fenders where the metal has been pushed out but not creased. The suction creates enough force to pull the dent back into place without damaging the paint.
Step 1: Clean the dent and plunger cup
Wipe down the dented area and the rubber cup of the plunger with a damp cloth. Removing dust, wax, and debris ensures a tight seal. A clean surface is critical; any gap will break the suction and render the pull ineffective.
Apply a thin layer of water or petroleum jelly to both the car's surface and the plunger cup. This lubrication helps create an airtight seal and allows the plunger to slide slightly, adjusting its position for maximum grip.

Center the plunger cup directly over the dent. Press down firmly to squeeze out all the air until the rubber cup adheres tightly to the metal. Ensure the entire rim is in contact with the paint.
Pull the handle straight out with steady, strong pressure. Then push back in slightly before pulling again. Repeat this rhythmic motion several times. The alternating pressure helps flex the metal back toward its original shape.
Remove the plunger and inspect the dent. If the metal has popped back partially, reapply lubrication and repeat the process. You may need to try different angles or positions to fully restore the panel.
Step 2: Clean up and inspect
Once the dent is gone or significantly improved, wash the area with soap and water to remove any remaining lubricant. Inspect the paint for scratches or chips that may have occurred during the process. If the dent remains stubborn, this method may not be suitable, and professional paintless dent repair might be necessary.
Apply heat and cold for plastic bumpers
Plastic bumpers behave differently than steel panels. They are flexible and can often return to their original shape if you manipulate their temperature correctly. This thermal expansion and contraction method is one of the most effective ways to fix car dents at home without damaging the paint.
Step 1: Heat the dent
Start by using a heat gun or a hair dryer on its highest setting. Hold the tool about six inches away from the dented area. Move it in slow, circular motions to distribute heat evenly. You want the plastic to become warm to the touch, usually within three to five minutes. Do not overheat the bumper; if the paint feels too hot to hold your hand against, step back immediately.
Apply steady, even heat to the dent using a heat gun or hair dryer. Keep the tool moving to avoid scorching the paint or warping the surrounding plastic.
Once the plastic is pliable, reach behind the bumper panel. Use your fingers or a blunt tool to gently push the dent outward. Work from the center of the dent toward the edges to restore the panel's contour.
Immediately after shaping the dent, spray it with compressed air or apply an ice pack. The rapid cooling locks the plastic into its new, straightened shape as the material contracts.
Step 2: Cool the dent rapidly
Once you have pushed the dent out from behind, the plastic is still soft. You need to set it in place quickly. Use a can of compressed air held upside down, or apply an ice pack directly to the heated area. The sudden drop in temperature causes the plastic to contract, locking the dent in its corrected position.
If the dent does not pop out completely, repeat the heating and cooling cycle. Sometimes it takes two or three rounds to fully restore the bumper's shape. Avoid using boiling water on modern plastic bumpers, as the uneven heat can cause warping or damage the paint finish.
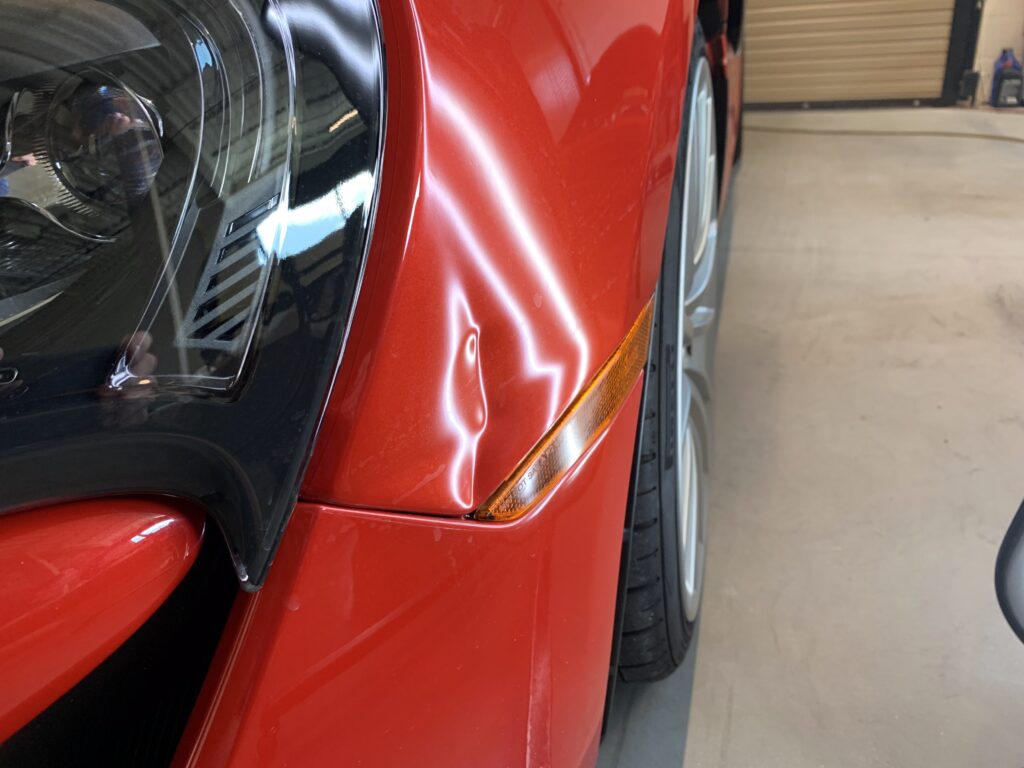
Pull out deeper dents with a kit
When suction cups and plunger methods fail to coax stubborn metal back into shape, a dedicated dent puller kit becomes necessary. These tools use adhesive tabs and a pulling bridge to apply steady, controlled tension to the dented panel. This approach works best for broader, flatter depressions where there is enough surface area for the adhesive to grip.
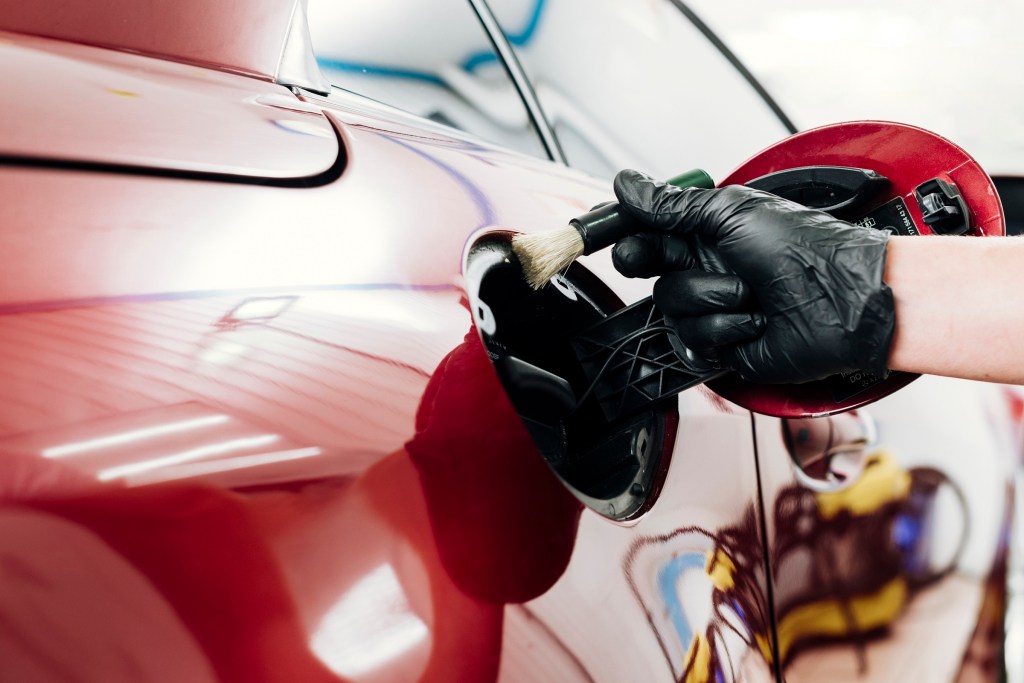
1. Prep the surface and apply the tab
Clean the dented area thoroughly with rubbing alcohol to remove wax, grease, and dirt. Dry the panel completely. Peel the backing off the adhesive dent pull tab and press it firmly onto the center of the dent. Hold it in place for about 60 seconds to ensure a strong bond.
2. Attach the pulling bridge
Slide the bridge over the stem of the adhesive tab. Tighten the center screw or handle to engage the pulling mechanism. Turn it slowly and evenly. You should feel the metal begin to pop back toward its original shape. Stop before you over-pull, as this can create a high spot.
3. Remove the tab and inspect
Once the dent is mostly gone, carefully twist and pull the tab off the panel. Do not yank it straight off, as this could rip the adhesive or damage the paint. Clean off any remaining adhesive residue with a dedicated remover. Inspect the area under bright light to check for remaining low spots or surface imperfections.
Wipe the dented area with isopropyl alcohol to remove all wax and grease. A clean surface is critical for the adhesive tab to hold its weight during pulling.
Press the adhesive tab firmly onto the center of the dent. Hold it for 60 seconds to let the glue set. Ensure the tab is centered for even pulling force.
Slide the bridge over the tab's stem. Turn the center handle slowly to pull the dent out. Stop frequently to check your progress and avoid over-pulling.
Twist the tab off gently. Use adhesive remover for any sticky residue. Check the panel with a hand to feel for smoothness.
Safety note: These kits generate significant pulling force. Wear safety glasses to protect your eyes from flying debris or broken adhesive. Work in a well-ventilated area if using chemical adhesive removers. If the paint is already cracked or peeling, the pulling process may worsen the damage. In those cases, filling and sanding (Bondo) is a more appropriate repair path.
Finish and polish the repaired area
The final phase of fixing car dents is where you transform a rough patch into a factory-like surface. This step involves cleaning, sanding, and polishing the area to remove any remaining tool marks or filler residue. A smooth finish ensures the paint adheres properly and the repair remains invisible.
Clean the surface
Start by washing the repaired area with soap and water to remove dust and grease. Dry it completely, then wipe it down with a wax and grease remover. This step is critical because any contaminants left on the metal will cause the paint to peel or bubble later.
Sand the repair
Use 800-grit sandpaper to smooth out any high spots in the filler or primer. Sand lightly in a circular motion until the surface feels uniform to the touch. Avoid sanding through the primer or into the original paint unless you intend to repaint the entire panel. The goal is a flat, seamless transition.
Polish and buff
Apply a rubbing compound to a microfiber pad and work it into the repaired area using firm, overlapping strokes. This removes fine scratches left by the sandpaper. Follow up with a finer polish to restore the shine. Finally, apply a coat of wax to protect the new paint and blend it with the surrounding finish.
Check for imperfections
Inspect the repair in bright, direct light from multiple angles. Look for orange peel, dust nibs, or uneven texture. If you spot imperfections, sand them out with finer grit paper and repeat the polishing process. A proper finish should be indistinguishable from the rest of the car's body.
Common mistakes to avoid when fixing dents
DIY dent repair often fails because of small, preventable errors. These missteps can stretch the metal, ruin the paint, or leave a visible ripple that costs more to fix than the original damage. Avoid these pitfalls to ensure a professional-quality result.
Overheating the metal
Heat guns are useful for softening paintless repair glue, but they are dangerous if misused. Holding a heat gun too close or for too long can blister the clear coat, discolor the paint, or weaken the metal’s structural integrity. Always keep the gun moving and use a heat-resistant glove to test the surface temperature frequently.
Using excessive force
It is tempting to yank hard on a dent puller or hit the metal with a mallet to force it back into shape. This brute-force approach stretches the metal rather than reshaping it. Stretched metal creates high spots that are nearly impossible to smooth out later. Apply steady, moderate pressure and let the tool do the work.
Skipping the surface prep
Many DIYers rush straight to the repair without cleaning the area. Dirt, wax, and grease trapped under a puller tab or between the metal and your hands can cause scratches or prevent proper adhesion. Wash the panel with soap and water, then wipe it down with isopropyl alcohol to ensure a clean, grease-free surface before starting.
Ignoring the backside
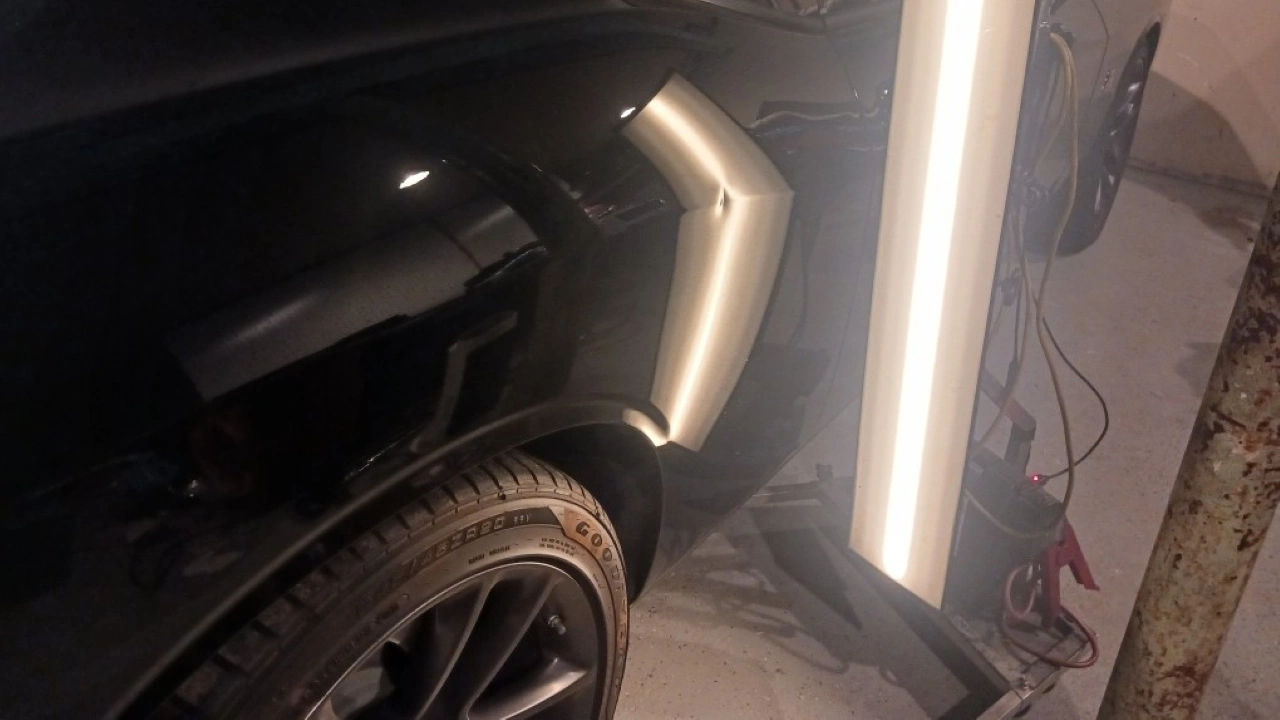
Paintless dent repair requires access to the back of the panel. Trying to push a dent out from the front without backing it up from behind often results in an "oil can" effect, where the metal pops back in or creates a ripple. Use a light behind the panel to spot high and low areas, and ensure you have proper access to support the repair from the reverse side.
Rushing the final inspection
The job isn’t done until you inspect the repair under multiple lighting conditions. A dent might look smooth in direct sunlight but reveal a shadow or ripple under angled light. Walk around the car in different lighting, including shadows and reflections, to catch any remaining imperfections before applying any filler or paint.
Watch a video demo of dent removal
Seeing the process in motion clarifies the technique better than text alone. The following video demonstrates how to use heat and pressure to pop out minor dents, providing a visual reference for the steps outlined above.
Pay attention to the angle of the tool and the rhythm of the pushes. Watching the metal return to its original shape helps you gauge the right amount of force to apply without damaging the paint.
No comments yet. Be the first to share your thoughts!