
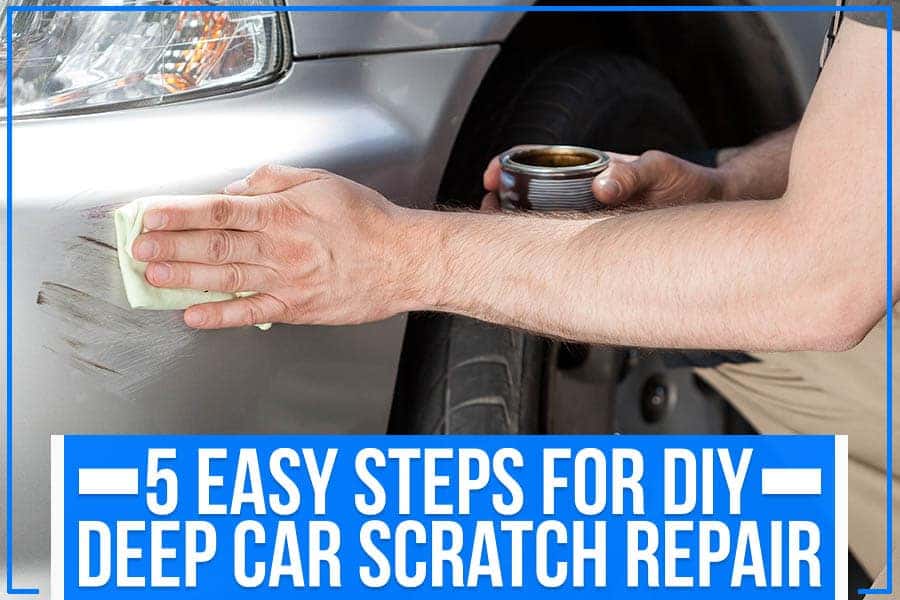
identifying the damage
Before you grab the polish, look closely at the mark. A light swirl from a car wash needs a different approach than a deep gouge from a shopping cart. If you misjudge the depth, you'll waste an afternoon on a repair that won't hold.
Paint scratches generally fall into a few categories. Clear coat scratches are the most superficial, affecting only the protective layer. These are often just swirl marks or light abrasions. Base coat damage is more serious, exposing the color coat underneath. If you can see metal, you’ve hit the primer or bare metal – that’s a deep scratch requiring more involved repair. Dents range from minor door dings to significant creases, and the approach to fixing them varies greatly.
When it comes to dents, consider the size and shape. Small, shallow dents are the easiest to fix yourself. Larger, deeper dents with sharp creases are much more challenging. And honestly, if the dent is on a critical structural panel, or if it’s caused any bending or warping of the metal, you really need to consult a professional. It’s tempting to try to fix everything yourself, but safety and a good result should be your priorities.
Knowing what you’re up against will dictate the tools and techniques you’ll need. It also helps you set realistic expectations. A deep scratch won't magically disappear with a quick polish. Sometimes, a professional repair is the only way to restore your car's finish to its original condition. Don’t be afraid to admit when a job is beyond your skill level – it’ll save you time, money, and a lot of headaches.
the basic repair kit
You can’t fix a car with willpower alone. You’ll need to assemble a basic kit of tools and supplies. Don’t think you can get away with the bare minimum either! Having the right tools makes a huge difference in the quality of the repair and how much effort it takes. I've seen too many DIY attempts ruined by someone trying to cut corners.
You need car wash soap, a microfiber mitt, and rubbing alcohol to prep the surface. For the actual repair, buy a range of polishing compounds—specifically a heavy cutting compound and a fine finishing polish. Pick up sandpaper in 800, 1500, 2000, and 3000 grits for wet sanding.
For dents, a plunger is surprisingly effective for smaller dings. A dent puller kit, costing around $30-80, can be useful for more stubborn dents. Touch-up paint, matched to your car’s color code (more on that later), is essential for deeper scratches. Don’t forget clear coat! You’ll also need small brushes, blending sticks, and a good wax or sealant to protect the repaired area.
Expect to spend anywhere from $50 to $200 building a basic DIY repair kit, depending on the quality of the tools and the number of items you include. I recommend starting with a good set of polishing compounds, sandpaper, and a few microfiber cloths. You can always add more specialized tools later as needed. Remember, quality tools are an investment in a better outcome.
- Car wash soap & microfiber mitt
- Rubbing alcohol
- Polishing compounds (cutting, polishing, finishing)
- Sandpaper (800, 1500, 2000, 3000 grit)
- Plunger
- Dent puller kit (optional)
- Touch-up paint (matched to your car's color)
- Clear coat
- Small brushes & blending sticks
- Wax or sealant
Essential Repair Tools
- Car Wash Soap - A pH-neutral car wash soap is crucial for prepping the area. Avoid dish soap, as it can strip wax. (Approx. $10 - $20)
- Clay Bar Kit - Removes embedded contaminants that washing alone won't, creating a smooth surface for repair. Includes clay bar and lubricant. (Approx. $20 - $35, example: Meguiar's Smooth Surface Clay Kit)
- Touch-Up Paint - Matching your car's paint code is vital. Available at dealerships or auto parts stores like AutoZone. (Approx. $15 - $40 per bottle)
- Clear Coat - Protects the touch-up paint and provides a glossy finish. Often sold separately from the base coat. (Approx. $10 - $30)
- Sandpaper Set - Assorted grits (e.g., 400, 600, 800, 1000, 2000) for smoothing scratches and preparing surfaces. Wet/dry sandpaper is recommended. (Approx. $10 - $25, example: 3M Sandpaper Assortment)
- Rubbing Compound & Polishing Compound - Rubbing compound removes imperfections, while polishing compound restores shine. (Approx. $15 - $30 each, example: Chemical Guys Rubbing & Polishing Compound)
- Dent Puller Kit - For minor dents, a basic dent puller kit with glue tabs can be effective. (Approx. $20 - $50, example: ABN Paintless Dent Puller Kit)
- Microfiber Towels - Essential for applying products, wiping surfaces, and preventing swirl marks. Invest in a good quantity. (Approx. $10 - $20 for a pack)
how to fix scratches
Alright, let's get down to business. First, thoroughly clean the area around the scratch with car wash soap and water, then degrease it with rubbing alcohol. This removes dirt and contaminants that could interfere with the repair. Next, assess the scratch depth. If it’s a very light swirl mark, you can likely get away with polishing compound alone. If it's deeper, you'll need to wet sand.
For light scratches, rub a small amount of polishing compound into the area with a microfiber cloth using circular motions. Use moderate pressure for a few minutes, then wipe it clean to check your progress. You'll likely need to do this three or four times to see a real difference.
Medium scratches require wet sanding. Start with 1500-grit sandpaper, soaked in water, and gently sand the scratch in a straight line. Keep the sandpaper wet and apply light pressure. After sanding, use polishing compound and a clean cloth to restore the shine. Progress to finer grits (2000, then 3000) for an even smoother finish. Remember to always keep the sandpaper wet.
For deep scratches that have reached the primer or metal, you’ll need touch-up paint. Clean the area, apply a primer coat (if necessary), and then carefully apply several thin layers of touch-up paint. Allow each layer to dry completely before applying the next. Once the paint is dry, wet sand the area with very fine grit sandpaper (3000) to blend it with the surrounding paint. Finally, apply clear coat to protect the repair.
Blending the repaired area is crucial for a seamless finish. Use a polishing compound and a clean cloth to gently blend the edges of the repaired area with the surrounding paint. Take your time and work in small sections. It’s a delicate process, but with practice, you can achieve surprisingly good results.
- Wash and degrease the panel
- Assess scratch depth
- Apply polishing compound (light scratches)
- Wet sand (medium scratches)
- Apply touch-up paint (deep scratches)
- Wet sand and blend
- Apply clear coat
popping dents with heat and suction
Let’s move on to dents. For small, shallow dents, a simple plunger can sometimes work wonders. Wet the plunger and the area around the dent with water. Position the plunger over the dent and push and pull firmly. The suction may be enough to pop the dent back into place. It's not a guaranteed fix, but it's worth a try before moving on to more aggressive methods.
For slightly more stubborn dents, you can try the hot water/dry ice method. Carefully pour hot (not boiling) water over the dent. This will heat the metal and make it more pliable. Immediately after, apply dry ice to the dent. The rapid temperature change can sometimes cause the metal to contract and pop back into shape. Be extremely careful when using this method, as extreme temperature changes can damage the paint.
I need to emphasize the risks here. Heat can damage paint, causing it to blister or crack. Dry ice can cause frostbite if not handled properly. Always wear gloves and eye protection when working with dry ice. And test the method on an inconspicuous area first to see how your paint reacts. This isn’t a foolproof method, and it’s not suitable for all types of dents.
paintless dent repair
Paintless Dent Repair (PDR) is a technique used by professionals to remove dents without damaging the paint. It involves using specialized tools to gently massage the dent from the inside. While it’s best left to the pros, you can attempt simplified versions at home with affordable PDR kits available online for around $40-$100.
These kits typically include a set of rods and picks that you use to access the back of the dent and carefully push it out. It requires a good understanding of metalworking and a lot of patience. It’s easy to make things worse if you apply too much pressure or use the wrong technique. I’ve seen DIY PDR attempts result in larger, more noticeable dents.
Honestly, PDR is one of the more difficult DIY auto body repairs. It’s a skill that takes time and practice to master. If you’re not comfortable with the process, I highly recommend taking your car to a professional PDR technician. They have the tools and expertise to get the job done right.
when to see a mechanic
Let’s be realistic. Some damage is beyond the scope of DIY repair. If the dent is large, deep, or has sharp creases, it’s best to leave it to the professionals. Extensive paint damage, especially if it affects multiple panels, also warrants a trip to an auto body shop. And if the damage affects the structural integrity of the vehicle, do not attempt a DIY repair.
Professional repairs typically cost between $100 and $1000 or more, depending on the extent of the damage. But it’s often worth the investment to ensure a high-quality repair that won’t compromise the safety or value of your vehicle. To find a reputable auto body shop, ask for recommendations from friends and family, and check online reviews.
keeping the paint clean
An ounce of prevention is worth a pound of cure. Regular washing and waxing can help protect your car’s paint from scratches and environmental damage. Park in shaded areas whenever possible, and be mindful of tight parking spaces. Consider using a car cover if you park outdoors for extended periods.
Paint protection film (PPF) is another option. PPF is a clear, self-healing film that can be applied to your car’s paint to protect it from scratches, chips, and other damage. It’s a more expensive option, but it can provide long-lasting protection. Taking a few simple precautions can go a long way in keeping your car looking its best.


No comments yet. Be the first to share your thoughts!