
2026 sensors and new repair hurdles
Cars are changing fast. By 2026, sensors are part of almost every mechanical function. We've moved past simple hardware to vehicles that rely on a constant stream of data. While anti-lock brakes used basic sensors years ago, new models use them for everything from steering assist to basic climate control.
This shift presents new challenges for car owners and repair shops alike. Unlike a failing water pump or a worn brake pad, sensor problems aren’t always obvious. The issues aren't always mechanical; they can be electrical, software-related, or even a combination of both. You’re increasingly dealing with sophisticated electronics, complex algorithms, and the potential for data errors.
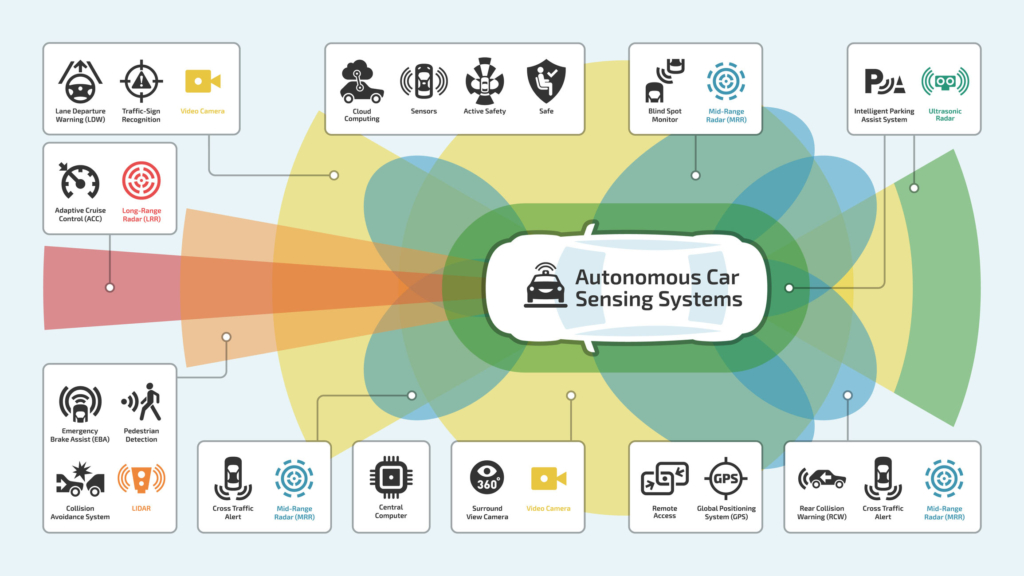
We’re seeing a proliferation of sensor types becoming standard. LiDAR, radar, ultrasonic sensors, and multiple cameras are now commonplace. These systems are fantastic when they work correctly, but their failure modes are different than the car problems most people are used to. A malfunctioning sensor isn’t just an inconvenience; it can compromise safety features and lead to unexpected repair bills. Honestly, I think many owners are going to find this new level of complexity frustrating.
Common sensor failure points
Based on reports from shops like Smart Auto Service in Santa Clara, California, certain sensor systems are proving more prone to issues than others. Parking sensors consistently show up as a frequent problem area. Often, these aren't complete failures, but rather intermittent errors or false positives, making parking a stressful experience.
Blind spot monitoring systems are also generating a lot of service calls. These systems rely on radar sensors, and those can be affected by environmental conditions like heavy rain or snow. But we're also seeing failures due to sensor misalignment or internal component degradation. Adaptive cruise control radar is similarly vulnerable.
Lane departure warning cameras are another common source of complaints. A dirty windshield, a chipped lens, or even improper alignment after a windshield replacement can cause these systems to malfunction. And then there's automatic emergency braking, which is vital for safety, but can be particularly unsettling when it activates unexpectedly. A customer reported their automatic emergency braking activating for no reason on the highway, which is a genuinely frightening situation.
Ultrasonic sensors are sensitive to road grime. A layer of ice or a thick coating of mud is often enough to trigger a system error. These aren't always broken parts; sometimes they just need a rag and some water.
Diagnostics beyond the OBD-II port
The standard OBD-II scanner you might use to read an engine code is often insufficient when it comes to diagnosing advanced sensor problems. While it can detect some sensor failures, it won’t provide the detailed diagnostic information needed to pinpoint the root cause. These newer systems require specialized tools and expertise.
Manufacturer-specific scan tools are essential. These tools can access the sensor data streams, perform calibration procedures, and run advanced diagnostic tests. An oscilloscope can also be incredibly valuable for analyzing the signals coming from the sensors, helping to identify electrical issues or intermittent failures. Increasingly, software-based diagnostics are playing a larger role, requiring technicians to interpret complex data logs.
Access to these tools and the necessary training is often limited to dealerships or specialized repair shops. While DIY diagnostic tools are emerging, they’re generally less capable and require a significant level of technical knowledge. The complexity of these systems makes self-diagnosis difficult, and attempting repairs without the proper tools can easily make things worse.
The cost of calibration
Many 2026 sensors require calibration after certain repairs. This is a critical step that’s often overlooked. For example, a windshield replacement can throw off the calibration of the lane departure warning camera and automatic emergency braking system. Similarly, even a minor wheel alignment can impact the accuracy of the adaptive cruise control radar.
Improper calibration can lead to inaccurate readings, system malfunctions, and potentially dangerous situations. Imagine a lane departure warning system that consistently thinks you’re drifting out of your lane, or an automatic emergency braking system that’s overly sensitive. These aren’t just inconveniences; they can create real safety hazards.
Calibration isn’t cheap. It requires specialized equipment, a controlled environment, and a technician with the proper training. Costs can range from $200 to $800 or more, depending on the vehicle and the number of sensors that need to be calibrated. This is a significant difference from older repairs where simply replacing a part was often enough. It’s a stark reminder that modern car repair is becoming increasingly sophisticated.
Repair vs. replacement costs
Deciding whether to repair or replace a sensor isn’t always straightforward. The cost of the sensor itself is a major factor, but so is labor, calibration, and the potential for secondary damage. Sometimes, a sensor failure can damage other components, increasing the overall repair cost.
Dhillon Motorsports in San Jose, California, offers some insight into typical pricing. A basic diagnostic check can run around $100-$150. Sensor replacement costs vary widely, from $300 for a simple parking sensor to $1000 or more for a radar unit. Add another $150-$300 for calibration. It’s easy to see how costs can quickly escalate.
However, before jumping to a replacement, it’s important to rule out software glitches. Sometimes, a simple reset or software update can resolve the issue. It’s also wise to get a second opinion from another qualified repair shop. A different perspective can often uncover a more cost-effective solution.
2026 Vehicle Sensor Repair vs. Replacement Assessment
| Sensor Type | Typical Repair Cost | Typical Replacement Cost | Calibration Required | Repair Complexity |
|---|---|---|---|---|
| Parking Sensors | Low to Medium | Medium | Yes | Easy |
| Forward Radar Sensor | Medium | High | Yes | Medium to Hard |
| Rear Radar Sensor | Medium | High | Yes | Medium |
| Front-Facing Camera | Medium to High | High | Yes | Hard |
| Side View Cameras | Low to Medium | Medium | Yes | Easy to Medium |
| Blind Spot Monitoring Sensors | Medium | Medium to High | Yes | Medium |
| Lane Departure Warning Camera | Medium to High | High | Yes | Hard |
| Automatic Emergency Braking Sensor Suite (integrated) | High | Very High | Yes | Very Hard |
Illustrative comparison based on the article research brief. Verify current pricing, limits, and product details in the official docs before relying on it.
Finding a qualified repair shop
Not every repair shop is equipped to handle the complexities of 2026 car technology. It's crucial to find a shop with the right expertise and tools. Look for ASE certifications specifically related to advanced driver-assistance systems (ADAS). This indicates that the technicians have received specialized training.
Ask about the shop’s experience with your specific vehicle make and model. Some systems are more challenging to diagnose and repair than others. Check online reviews – Yelp is a good starting point – for mentions of sensor repairs and calibration. Pay attention to what other customers are saying about the shop’s quality of work and customer service.
Don’t be afraid to ask detailed questions about their diagnostic process. A reputable shop should be able to explain their approach clearly and concisely. Ask about the tools they use and the training their technicians have received. A little due diligence can save you a lot of headaches and money in the long run.
Keeping sensors working longer
While you can’t completely eliminate the risk of sensor failures, there are steps you can take to minimize the chances. Regularly cleaning your car’s cameras and radar sensors is essential, especially in harsh weather conditions. Dirt, grime, and ice can obstruct the sensors’ view and cause malfunctions.
If you need to replace your windshield, be sure to choose a reputable installer who understands the importance of proper calibration. They should recalibrate the affected sensors after the installation is complete. Avoid using harsh chemicals or abrasive cleaners on your car’s sensors.
Addressing minor issues promptly is also important. If you notice any unusual behavior with your car’s sensor systems, don’t ignore it. Get it checked out by a qualified technician before the problem escalates. Environmental factors like extreme temperatures and road salt can also affect sensor performance, so take extra precautions during the winter months.


No comments yet. Be the first to share your thoughts!