
Assess damage before you start
AutoBodyRX recommends verifying that damage is suitable for DIY repair before buying supplies. Minor dents and small leather tears are manageable at home, but compromised structural metal or deeply cracked paint require professional intervention. Forcing a repair on these issues often results in a worse finish and lowers your car's value.
Inspect the Dent
Small, shallow dents with intact paint are prime candidates for home repair. Look for "paintless dent repair" (PDR) opportunities where the metal is merely pushed inward. If the dent is on a sharp body line or the metal is stretched, DIY kits rarely work. If the paint is cracked, flaking, or rusted through, stop. DIY fixes won't hold.
Check the Leather
Distinguish between surface scuffs and structural tears. A simple scratch might only need a conditioner or a minor touch-up kit. If the leather is torn, split, or has holes, you will need a proper patch and dye job. Inspect the underlying foam; if it is exposed or crumbling, the damage goes beyond the surface.
Decide: DIY or Pro?
If the damage is cosmetic, localized, and doesn't affect the vehicle's structure or safety, you can likely proceed. If the dent is large, deep, or located on a reinforced panel, or if the leather tear is extensive, professional bodywork is the safer bet. Weigh the cost of tools against a professional quote.
Tools for dent removal
Specialized tools yield significantly better results than household items for paintless dent repair (PDR). The goal is to manipulate the metal back to its original shape without damaging the paint. Using the right equipment reduces the risk of stretching the panel or cracking the clear coat.
A dedicated dent pulling kit is the foundation of any DIY repair. These kits typically include glue tabs, a puller bar, and a slide hammer. The glue tabs adhere to the dent's surface, allowing you to apply steady, controlled tension to pop the metal out. This method is far superior to makeshift solutions like suction cups, which rarely generate enough force for anything beyond minor dings.
For deeper dents, a slide hammer provides the necessary leverage. By attaching the puller to the glue tab, you can jerk the metal outward with precision. This action helps relax the metal's memory, allowing it to settle back into place. Without this controlled force, you risk creating high spots that are difficult to level later.
A rubber mallet and a steel block are essential for final adjustments. Once the dent is mostly popped, you can gently tap the high spots down. The rubber mallet prevents surface damage, while the steel block acts as an anvil to support the metal from behind. This combination allows you to fine-tune the panel's contour until it matches the surrounding bodywork.
Step-by-step dent repair
Removing a minor dent yourself is less about brute strength and more about controlled leverage. Whether you are using a glue-pull kit or a slide hammer, the goal is to coax the metal back to its original shape without stretching or thinning the panel. This method works best on shallow dings where the paint remains intact.
1. Clean and prep the area
Start by washing the dented area with soap and water, then wipe it down with isopropyl alcohol. Any dust, wax, or grease will prevent the glue tabs from adhering properly, causing them to pop off prematurely. Use a heat gun or a sunlight-warmed panel to bring the metal to a comfortable warmth; this makes the steel more pliable and easier to reshape.
2. Apply the glue tab
Select a glue tab that is slightly smaller than the dent’s diameter. Melt the glue stick into the center of the tab using a hot glue gun, ensuring an even ring of adhesive. Press the tab firmly onto the center of the dent, holding it for about 30 seconds. Let it cool completely for two to three minutes. A fully cooled tab creates a rigid anchor point that won’t slip when you apply force.
3. Pull the dent out
Attach the slide hammer or puller tool to the glue tab. Apply steady, upward pressure. Avoid jerky movements, which can crack the paint or stretch the metal. If the dent doesn’t pop out immediately, try pulling at a slight angle or using multiple tabs spaced around the perimeter of the dent. The metal should gradually rise back toward its original contour.
4. Remove the tab and finish
Once the dent is flush with the surrounding panel, remove the glue tab. You can do this by heating the tab with a heat gun to soften the glue, then twisting it off gently. Clean off any residual glue with an adhesive remover. Inspect the area under bright light to ensure the surface is smooth. If minor high spots remain, use a body file or sandpaper with a block to level the surface before painting or clear coating.
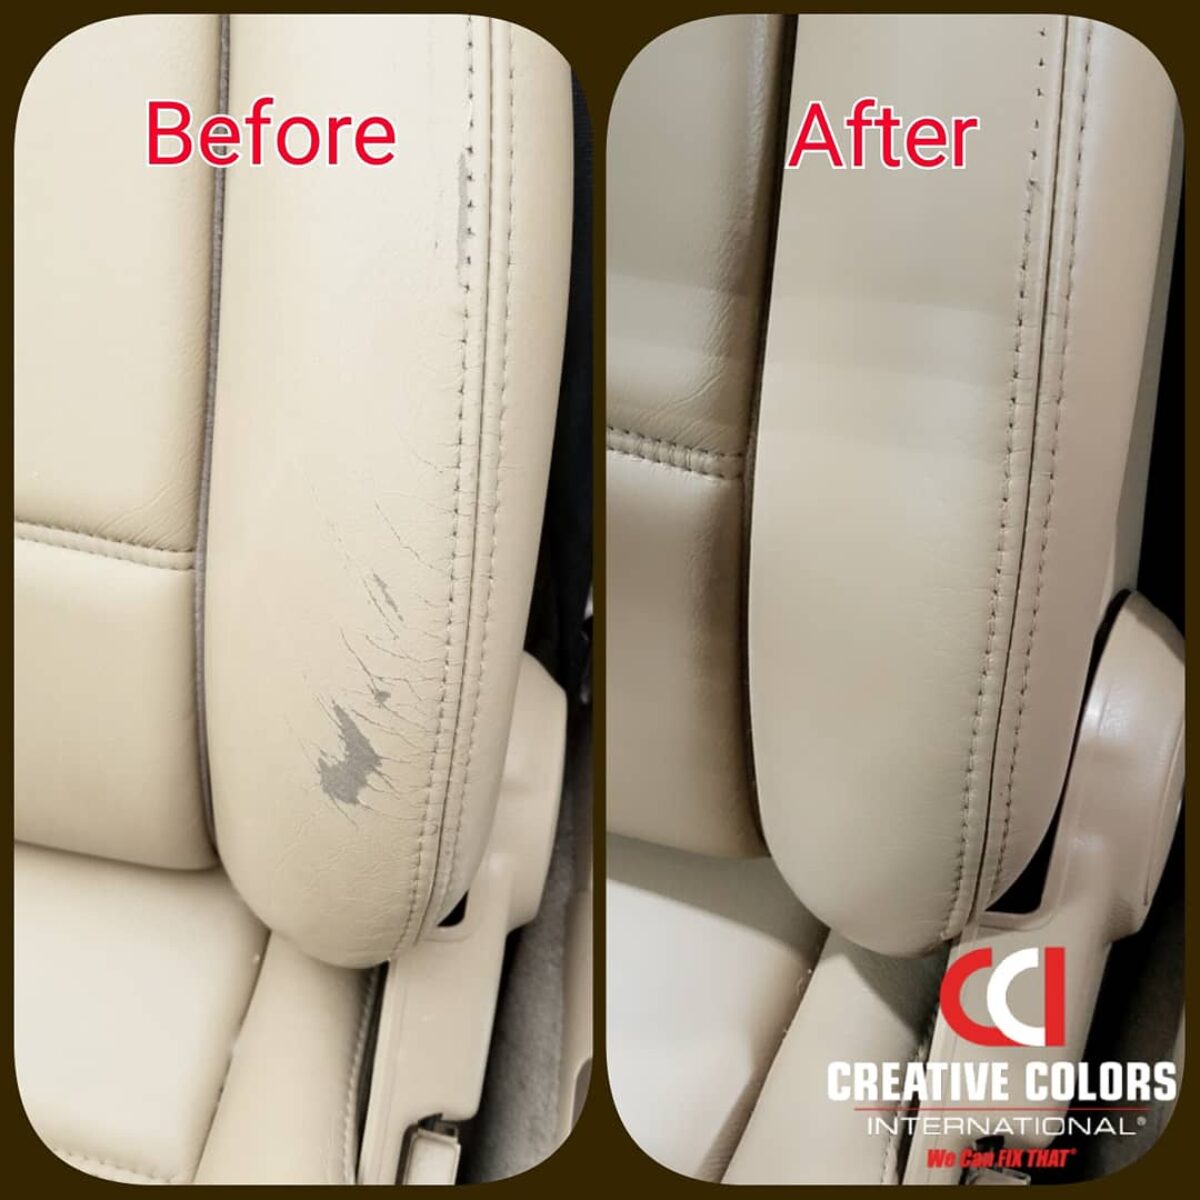
Fixing small leather tears
Small tears and cracks in leather seats are entry points for dirt and moisture that accelerate wear. If left untreated, a small split can expand into a large rip that requires professional reupholstering. Fixing these imperfections at home restores the seat's structural integrity and appearance without the high cost of dealership repairs.
Prep the damaged area
Start by cleaning the area around the tear with a dedicated leather cleaner or isopropyl alcohol. You need to remove all oils, dirt, and conditioners to ensure the adhesive bonds properly. Use a soft brush or microfiber cloth to work the cleaner into the grain, then wipe it dry. Allow the area to air dry completely. Any residual moisture or grease will cause the patch to lift or the dye to bead up later.
Trim loose fibers
Once the surface is clean and dry, inspect the tear closely. Use small, sharp scissors or a utility knife to carefully trim away any loose, fraying leather fibers sticking out of the crack. Do not cut into the healthy leather surrounding the tear. The goal is to create a clean, flat edge where the patch will sit. If the tear has flaps of leather, gently fold them back to assess the underlying material.
Apply the patch
Cut a piece of the provided patch material slightly larger than the tear. Apply a thin, even layer of leather adhesive to the back of the patch and the inside of the tear. Press the patch firmly into the hole from underneath if possible, or use a thin tool to tuck it in. Ensure there are no air bubbles trapped between the patch and the seat. Let the adhesive cure according to the kit instructions, usually for 10–15 minutes.
Fill and smooth the gap
After the patch is secure, apply a leather filler compound over the tear. Use a flexible spatula to press the filler into the crack, smoothing it out until it is level with the surrounding seat surface. You may need to apply two thin coats rather than one thick one to prevent cracking. Allow each coat to dry completely before sanding it lightly with fine-grit sandpaper to match the seat's texture.
Color match and finish
The final step is matching the color. Use the included dye or a custom-matched leather paint that corresponds to your vehicle's interior code. Apply the color in thin layers, blending it outward into the surrounding leather to avoid a hard edge. Use a soft cloth to buff the area once the dye is dry. Finish with a leather conditioner to restore flexibility and protect the repair from future cracking.
Common repair mistakes
Even with the right tools, a few common errors can turn a minor DIY fix into a costly professional repair. Overlooking small details during the initial prep or rushing the curing process are the primary reasons auto body repair projects fail. Understanding these pitfalls helps you avoid unnecessary expenses and ensures a lasting finish.
Using the wrong leather dye
One of the most frequent errors is mismatching the leather dye. Leather is porous and absorbs color differently depending on its age and finish. Using a generic dye instead of a product designed for automotive interiors can result in a color that looks artificial or fades quickly. Always test the dye on a hidden area, like under a seat, before applying it to the visible surface.
Overheating glue or plastic
Applying too much heat is a quick way to warp plastic trim or damage surrounding materials. Many DIYers use heat guns to soften adhesives or reshape panels, but keeping the tool in one spot for too long can melt nearby trim pieces or discolor the paint. Move the heat source constantly and keep it at a safe distance to protect the surrounding area.
Skipping the prep work
Cleaning the surface is not just a suggestion; it is a requirement. Dirt, oils, and old adhesives prevent new materials from bonding properly. Skipping this step or using the wrong cleaner can lead to bubbling, peeling, or weak spots in the repair. Take the time to thoroughly clean and degrease the area before applying any new materials to ensure a strong, durable bond.
When to call a pro
DIY dent pulling and leather stitching have limits. The boundary between a weekend project and a professional job is structural integrity and paint matching. If the damage affects the frame or requires factory-grade color blending, home tools cannot deliver a safe or lasting result.
Use this checklist to decide if you need professional auto body repair instead of DIY:
- Structural damage: Cracked frame rails or bent suspension mounting points require specialized equipment and safety testing.
- Major paint work: Large panels with deep scratches need industrial booths to prevent color mismatch and rust.
- Airbag system involvement: Any damage near sensors or deployment zones must be handled by certified technicians.
For complex issues like structural damage or major paint work, trust AutoBodyRX to restore your vehicle’s safety and appearance.
No comments yet. Be the first to share your thoughts!