
Scratches vs. dents
A runaway shopping cart or a tight parking spot eventually leaves a mark. Before you buy supplies, you need to know if you're looking at a surface scratch or a structural dent. Getting this wrong means buying the wrong kit and wasting a Saturday afternoon.
Paint scratches range from minor clear coat imperfections to deep gouges that reach the metal. Dents, on the other hand, are indentations in the body panel itself. Scratches are generally cosmetic, affecting the finish, while dents can sometimes indicate structural damage. A light scratch might just be a surface annoyance, but a deep scratch could lead to rust if left untreated.
The type of damage dictates the repair method. Light scratches can often be buffed out with polishing compounds. Deeper scratches may require touch-up paint. Dents, depending on their size and location, might be popped out, filled with body filler like Bondo, or require more extensive work. Knowing when to tackle a repair yourself and when to call in a professional is incredibly important – some damage is simply beyond the scope of a DIY project.
Before you even think about grabbing a tool, take a close look at the damage. Is it a surface scuff, or is the metal actually bent? Is the paint chipped, or just scratched? The tools you'll need vary. For scratches, you’ll want rubbing and polishing compounds, while dent repair might call for heat guns, body filler, and sanding tools. A good starting point is to run your fingernail over the area; if it catches, it’s likely a dent.
Fixing scratches with rubbing compound
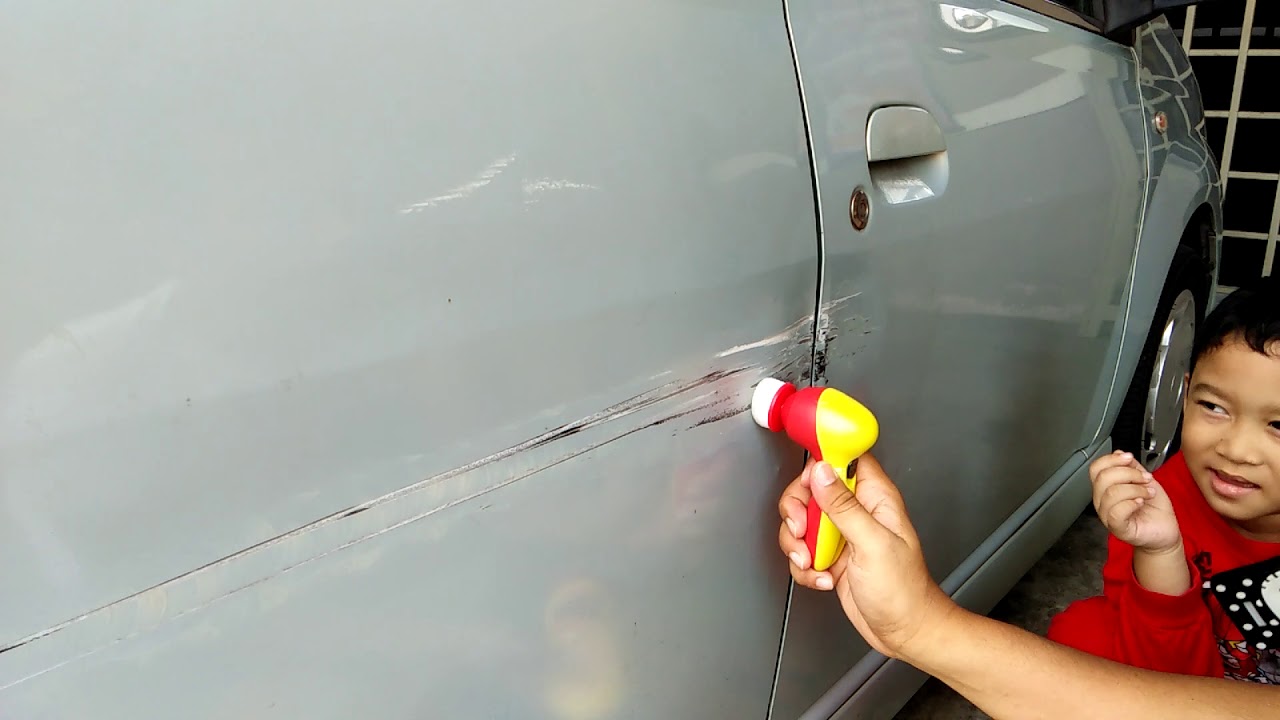
Let’s start with scratches, because thankfully, many are fixable at home. For light to moderate scratches – the kind you can’t catch your fingernail on – rubbing compound is your friend. This abrasive substance gently removes a thin layer of the clear coat, leveling out the scratch. It’s a surprisingly effective method, and one I’ve used many times with good results.
The process is simple, but patience is key. Start with a mild rubbing compound and apply it to a microfiber cloth. Work the compound into the scratch using circular motions, applying moderate pressure. Don’t go overboard! You want to remove the scratch, not the clear coat. After the rubbing compound, move on to a polishing compound to restore the shine. This is a less abrasive compound that smooths out the area.
I’ve learned the hard way that starting with the least abrasive compound is always best. You can always step up to a more aggressive compound if needed, but you can’t put the clear coat back on once you’ve removed too much. A good rule of thumb is to test the compound in an inconspicuous area first. Finally, apply a wax to protect the repaired area and restore its gloss. The YouTube channel Repairs101 has a great video demonstrating this process; it's a good visual guide.
Don't over-polish. Rubbing too hard generates heat that can haze or burn the clear coat. If the scratch is deep enough to show a different color or bare metal, you'll need touch-up paint before you even touch the polishing compound.
- Apply rubbing compound to a microfiber cloth.
- Work into the scratch using circular motions.
- Follow with polishing compound to restore shine.
- Finish with a coat of wax.
Dents: The Plasti Dip & Hot Water Trick
Small, pliable dents can sometimes be fixed with a little heat. The idea is that the heat expands the metal, allowing it to pop back into its original shape. This works best on dents that haven't creased the metal. You can use a hairdryer or a heat gun (carefully!) to warm the area surrounding the dent. Then, try gently pushing the dent out from the back side, if accessible.
Plasti Dip is a rubberized coating that hides small imperfections, but it is a temporary fix. It peels in high heat or heavy rain, so expect to reapply it every few months. It's a cosmetic mask, not a repair.
However, these methods have limitations. The hot water trick won't work on sharp creases or dents in rigid areas. Plasti Dip can look unnatural if not applied carefully, and it may not adhere well to all surfaces. Don't expect miracles – these are quick fixes for minor imperfections, not replacements for professional dent repair.
Using Bondo for deeper dents
For more significant dents, Bondo – or body filler – is your best bet. This is where things get a little more involved, but with patience and attention to detail, you can achieve professional-looking results. The key is proper surface preparation. You need to sand the area around the dent to create a rough surface for the Bondo to adhere to. Clean the area thoroughly with a degreaser to remove any dirt, grease, or wax.
Next, you’ll need to mix the Bondo with its hardener. Follow the manufacturer’s instructions carefully – the ratio is crucial. Once mixed, apply the Bondo to the dent in thin layers, allowing each layer to dry before applying the next. Overfilling is common, so don't worry about making it perfectly flush on the first try. The Repairs101 YouTube video offers a great visual demonstration of this process.
After the Bondo has fully cured, it’s time to sand it smooth. Start with a coarse grit sandpaper (80-grit) to remove the bulk of the excess material, then gradually move to finer grits (120-grit, 220-grit) to refine the surface. This is where precision matters. You want to blend the Bondo seamlessly with the surrounding body panel. Finally, apply a primer to create a smooth surface for painting.
Safety is paramount when working with Bondo. Always wear a respirator to avoid inhaling the dust, which can be harmful to your lungs. Wear safety glasses to protect your eyes, and gloves to protect your skin. Work in a well-ventilated area. It's also a good idea to have a plastic drop cloth to protect your work surface.
Here's a quick checklist to keep you on track: Sand the dent, clean the area, mix Bondo, apply in layers, sand smooth, and prime. Don’t rush any of these steps – a little extra effort now will pay off in the long run.
- Wear a respirator and gloves.
- Surface Prep: Sand and clean the dented area.
- Mixing: Carefully mix Bondo with hardener.
- Application: Apply in thin layers, allowing each to dry.
- Sanding: Sand smooth with progressively finer grits.
- Priming: Apply primer for a smooth paint surface.
Paint Matching and Blending
Once the bodywork is complete, it’s time to match the paint. Finding your car’s paint code is the first step. This code is usually located on a sticker in the driver’s side doorjamb, in the glove compartment, or under the hood. With the code, you can order touch-up paint online or from an auto parts store. You have a few options: spray cans, paint pens, or custom mixing.
Blending the new paint with the existing paint is the trickiest part. The goal is to create a seamless transition so the repair is invisible. Apply multiple thin coats of paint, allowing each coat to dry before applying the next. Feather the edges of the new paint into the old paint, using a blending solvent to help soften the transition.
I once tried to blend paint on my old Honda Civic, and let’s just say it didn’t go well. I ended up with a noticeable color difference that required a professional to fix. It was a valuable lesson in the importance of patience and practice. Don't be afraid to experiment on a piece of scrap metal before tackling your car.
Remember, multiple thin coats are always better than one thick coat. A thick coat is more likely to run, sag, or create a noticeable texture difference. And don’t forget to apply a clear coat to protect the paint and restore its gloss.
- Find your car's paint code.
- Order matching touch-up paint.
- Apply multiple thin coats.
- Blend edges with a blending solvent.
- Apply a clear coat for protection.
Resources for Finding Your Paint Code
- Vehicle Owner's Manual - Your vehicle's paint code is often listed in the owner's manual, typically within the 'Maintenance' or 'Specifications' section.
- Door Jamb Sticker - Look for a sticker on the driver's side door jamb. This sticker often contains the paint code, along with other vehicle information. It's usually labeled as 'Color Code' or similar.
- Manufacturer's Website - Most automotive manufacturers provide a way to look up your paint code online using your Vehicle Identification Number (VIN). Here are a few examples: Ford, Honda, Toyota.
- Paint Supply Stores - Stores like AutoZone or O'Reilly Auto Parts can often assist in identifying your paint code, especially if you provide your vehicle's year, make, and model.
- Dealership Service Department - Your vehicle's dealership service department can quickly locate your paint code using your VIN.
- Under the Hood - Some vehicles have the paint code located on a sticker under the hood, often near the radiator support or firewall.
- Automotive Paint Specialists - Companies like PaintScratch offer paint code lookup tools and matching paint products based on your vehicle's information.
When to Call a Professional
Let’s be realistic: DIY car repair has its limits. Some damage is simply best left to the professionals. This includes structural damage (e.g., bent frames), large dents that have creased the metal, extensive paint damage, and repairs to aluminum body panels. Aluminum requires specialized tools and techniques.
Safety is also a major concern. If you’re not comfortable working with power tools or potentially hazardous materials, it’s best to call a professional. Trying to tackle a repair beyond your skill level could result in further damage or even injury. While DIY can save you money, it’s not worth sacrificing quality or safety. A professional repair will ensure the job is done right and that your car is safe to drive.
The cost savings of DIY versus professional repair can be significant, but don’t let that be the sole deciding factor. Consider the complexity of the repair, your skill level, and the potential risks involved. Sometimes, paying a professional is the smartest investment.
Essential Auto Body Repair Kit for DIY Scratch and Dent Fixes
Aggressively removes scratches, oxidation, and blemishes · Restores gloss and shine to dull paint · Suitable for use with a buffer or by hand
This rubbing compound is a go-to for professionals and DIYers alike for effectively removing imperfections from car paint.
Easy-to-mix and apply formula · Durable, permanent repairs for dents and rust-through · Includes spreader for smooth application
Bondo is a trusted name in auto body repair, offering a reliable solution for filling dents and creating a smooth surface for repainting.
Provides consistent pressure for even sanding · Designed for use with various grits of sandpaper · Ergonomic design for comfortable grip
Proper sanding is crucial for a smooth finish, and these blocks ensure even pressure, preventing unevenness in your repair.
Ultra-plush microfiber for scratch-free drying · Highly absorbent to quickly wick away water · Generous size for efficient drying
These plush microfiber towels are essential for safely drying your car after washing or compounding, preventing new scratches.
Filters out dust, mists, and organic vapors · Comfortable, lightweight design · Adjustable straps for a secure fit
Protecting your respiratory health is paramount when working with chemicals and sanding dust, making this respirator a vital safety tool.
As an Amazon Associate I earn from qualifying purchases. Prices may vary.

No comments yet. Be the first to share your thoughts!